Carry Freedom Bike Trailer --- 5/12/2014
One afternoon my partner and I were discussing purchasing a bike trailer for bike hauling/touring purposes. In the midst of our web query of various options, we stumbled across a build your own bike trailer design by Carry Freedom. The purpose of this non-profit venture by Carry Freedoms in their own words: "Places that need a bike trailer the most, often have the least capacity to build or buy them. Carry Freedom developed the Bamboo trailer to allow anyone the ability to build a strong adaptable trailer from anything." Right on Carry Freedom! After perusing the plans, and given that we live on a tropical island where bamboo grows naturally, it was decided. We would build our bike trailer. We are very impressed with how well it works.
 |
| Supplies |
 |
| Frame |
 |
| Adding wheels |
 |
| Sinew |


Project: Bike Wheels 8/1/2014
The allure of building your own wheels does not disappoint. I first learned how to build wheels at Sunrise Cyclery in Minneapolis. My teacher was, and still is, my bike sensei Jamie McDonald. He has built hundreds, maybe even thousands of wheels. The pair below is my 3rd pair which brings my grand total to 6. However, that number would increase if I counted the multiple times I built up a wheel and realized my spoke length calculations were off and my spokes were too short/ long. Although it may seem like a challenge, building wheels is a fun, doable, and rewarding project.
My Supplies:

Hubs: Hope RS Mono front and rear
Spokes: Single butted spokes. 28 in front, 32 in back. I would have preferred to use a double butted spoke like the DT Swiss Competition. However, they were too costly to ship to Okinawa and the three shops I tried to purchase them in on island either did not carry them or too much was lost in translation while trying to describe what I was interested in.
Spoke Prep: I used linseed oil. Spoke prep works as well. The function is to lubricate the spoke threads for building but harden or get sticky over time to prevent spokes from loosening while riding.

-Spoke wrench
-Spoke tension tool
-Spoke nipple driver or flat head screwdriver
-Truing stand

Step 1: First, calculate the proper spoke length necessary for the hubs and rims you are using. The front wheel will have the same length of spokes on each side while the rear will have a different length for the drive side vs. the non drive side. There are many spoke calculators out there to make this step easy. Here is a spoke calculator that I like and used for this project.
Step 2.: Dip spokes in linseed oil to lubricate and proceed to drop spokes into the hub every other hole.

Step 3: Pick a spoke and thread it (loosely) into the first position on the rim. The first hole to the right of the valve stem. Thread the rest of the spokes into the rim every 3 holes.

Step 4: Twist the spokes away from the valve stem hole and flip the rim over. Drop the remainder of the spokes into the hub.


Step 5: Pick a spoke. Thread under, under, over and through the middle rim hole.

Step 6: Follow the spoke directly to the right of the valve down to the first spoke it crosses on the hub. Drop a spoke through the other side. Pull the spoke through the empty hole on the rim next to the valve

Step 7: Drop spokes through every other hole

Step 8: Feed all spokes through the rim in the middle of the parallel spokes

Step 9: Flip wheel over and drop the remainder of the spokes in the hub ( head side opposite of the other spokes ) and drop through the big V after a pinch
Step 10: Feed all spokes under under over before tightening

Step 11: Set the spokes into the rim by squeezing each side of spokes together pressing them into the hub flanges
Step 12: Tighten all spokes to your fingernail placed at the bottom of the threads on the spoke. The more consistent your tightening here, the easier your job truing the wheel will be
Step 12: Tighten all spokes to your fingernail placed at the bottom of the threads on the spoke. The more consistent your tightening here, the easier your job truing the wheel will be
Step 13: Tension the wheel by turning each spoke 1 or 2 full revolutions. Keep this as consistent as possible. When the wheel starts coming into tension, in Sheldon Brown's words, " There are 4 different things that you need to bring under control to complete the job: lateral truing, vertical truing, dishing, and tensioning. As you proceed, keep checking all 4 of these factors, and keep working on whichever is worse at the moment." Check out his take on wheel building here

Home Project: Paddle Boards 3.13.2016
I remember the scene clearly, my partner and I were sitting on the couch surfing the web on a breezy day in October. We were trolling the inter webs interested in purchasing kayaks for fun/fishing. Out of the blue, he suggested, "how about we build paddle boards?" Without hesitation I enthusiastically replied "sure!" And it was settled.
This post will mostly be a photo journal of the process of building these boards rather than an explanation of each step. For that, we watched a LOT of youtube surf/paddle board building vids and read blogs ect. We had 0 experience building paddle boards before we started this project. Although, my partner was employed for 4 summers during college building fiberglass bathtubs. Which proved to be a handy knowledge base. This project took a 8 months of a to complete and was a
ton of work. What a relief to arrive at the fun finished product!
Step One: Choose board style and make blue print. Find board materials. We used foam board insulation from a hardware store. Make blank. Glue foam together to make desired width/length. We used epoxy as our glue for blank construction.
 |
| Plans for the design |
 |
| Size of boards is specific to performance goals |


Step 2: Shape and sand foam blank. We used a sure form file and 60 grit sandpaper. Also add wood inserts for mounting hardware if desired. These wood inserts are specifically for mounting tie down rings for securing cargo on a fishing paddle board.


Step 3: Fiber glass the board. We used 6 oz fiber glass cloth and epoxy resin from a local surf board shop.

Step 4: Sand fiberglassed board.

Step 5: Install leash cup and vent and fin box


Step 6: Paint board. We simply used spray paint with a clear coat on top & Poska Pens for finer designs.

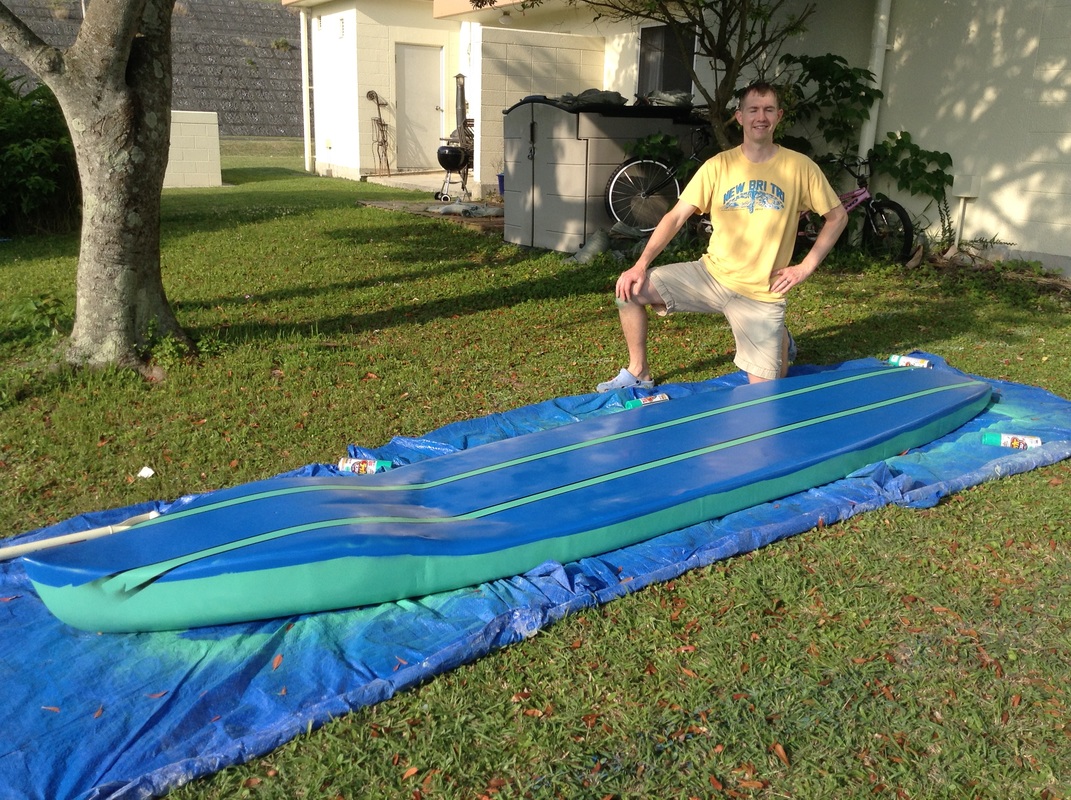


All done!

No comments:
Post a Comment